In the world of computing, every laptop and PC comes equipped with internal fans. Whether you’re using a high-end gaming rig or a regular laptop, these fans play a critical role in maintaining your system’s temperature within safe limits. They automatically adjust their speed based on various factors, ensuring your hardware remains cool and operational. In this comprehensive guide, we’ll explore how fans work to cool a PC and how you can take control of their speed on Windows 10.
Why is Monitoring CPU Fan Speed Important?
Before we dive into the methods, let’s understand why it’s essential to monitor and control CPU fan speed on your Windows computer. The primary function of CPU fans is to dissipate heat generated during intensive computing tasks. If your CPU fans run constantly at high speeds, it’s a sign that your system is under stress, which can lead to several problems, including potential issues with your power adapter.
Fans in your laptop or PC possess built-in sensors that continuously monitor your system’s temperature. When the temperature crosses a certain threshold, these fans kick into action, spinning faster to cool your hardware down. This mechanism is crucial to prevent overheating, which can lead to severe damage to your computer components.
Additionally, the design of your laptop or PC chassis facilitates the flow of air to aid in the cooling process. It’s essential never to obstruct these vents, as doing so can disrupt the cooling mechanism and lead to overheating.
Why You Might Want to Control Fan Speed
Maintaining optimal CPU fan speed on your Windows computer is crucial for ensuring your system’s performance and longevity. A well-regulated fan speed not only keeps your CPU cool but also prevents overheating issues that could lead to hardware damage. In this comprehensive guide, we will delve into various methods to control and adjust CPU fan speed effectively. Whether you prefer using the Control Panel, tweaking BIOS/UEFI settings, or relying on third-party software like SpeedFan, we’ve got you covered.
While your system’s fans are designed to automatically manage temperature, there are situations where you might want to take manual control:
Energy Efficiency: If your fans run constantly at high speeds, your PC consumes more energy than necessary, which can lead to increased heat generation and power adapter strain.
Noise Reduction: High fan speeds can be noisy, and controlling them can help reduce the noise generated by your system.
Custom Cooling: Some users may have specific cooling requirements for tasks such as gaming or video editing, where manually adjusting fan speed can be beneficial.
Controlling Fan Speed on Windows 10
To gain control over your fan speed on Windows 10, you’ll need to utilize third-party applications. We recommend two excellent options for achieving this:
1. SpeedFan
SpeedFan is a reliable utility for managing fan speeds on Windows 10. Here’s how to use it:
Installation: Download and install SpeedFan.
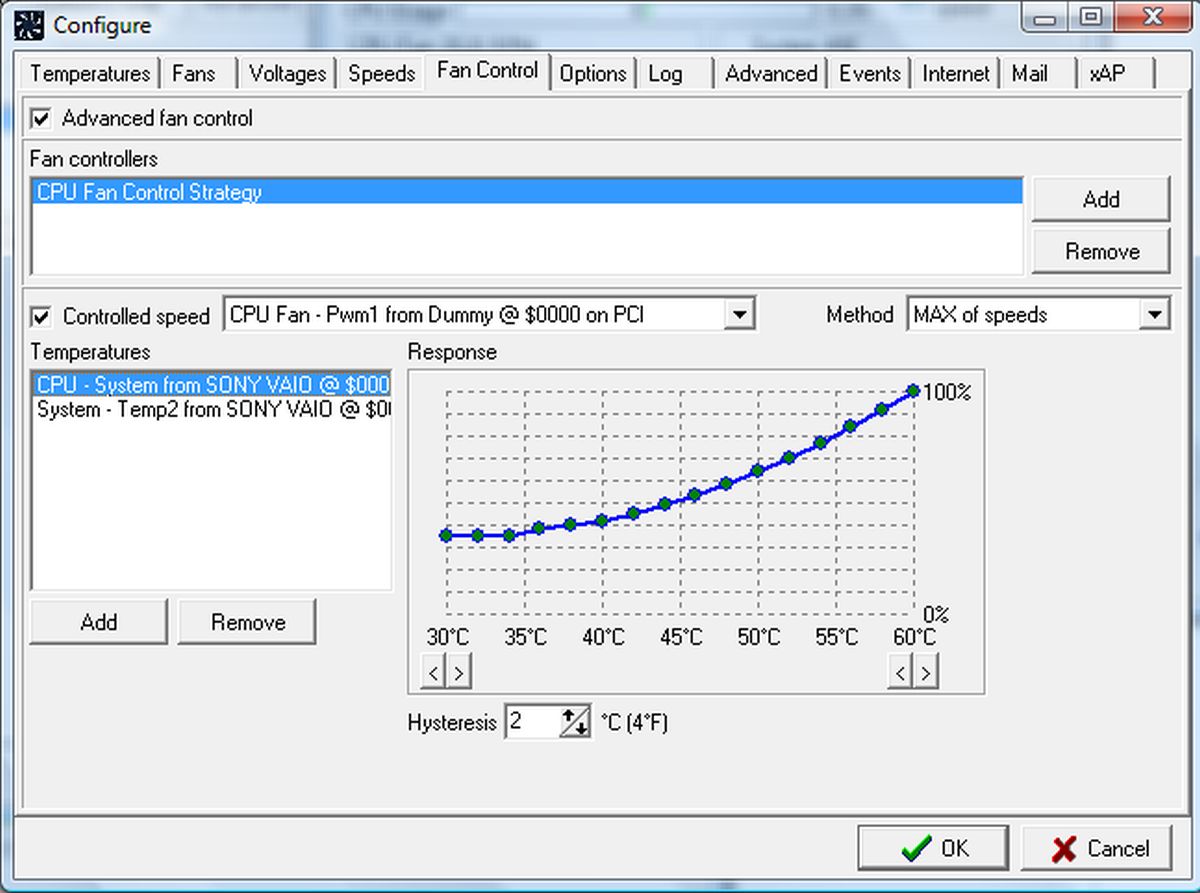
Configuration: Launch SpeedFan and click the ‘Configure’ button on the main window.
Fan Selection: In the Fans tab, wait for the app to detect and list your system’s fans.
Customization: Choose the fan you wish to control and use the response curve to adjust its speed. The response curve correlates heat levels with fan speed, ensuring your system remains cool when needed.
HWiNFO is another powerful tool for fan speed control on Windows 10. Follow these steps:
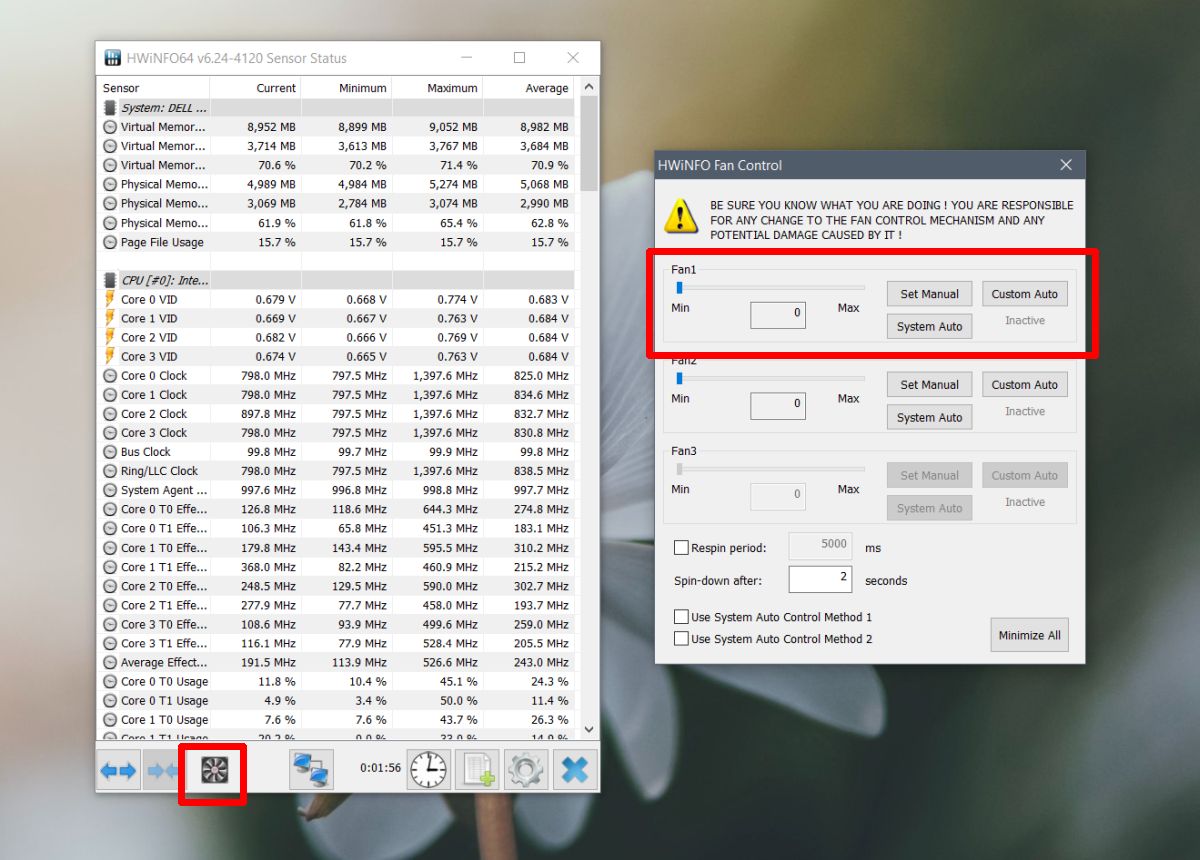
Running the App: Start by running HWiNFO and click on “Sensors” from the main window.
Confirmation: Confirm any pop-up messages that appear.
Fan Control: In the newly opened window listing various system sensors, look for the “Fan” button at the bottom and click it.
Fan Selection: Here, you will see up to three active fans. Select the one you want to control.
Manual Control: Click ‘Set manual’ to manually set the fan’s speed.
It’s essential to note that HWiNFO doesn’t directly correlate fan speed with your PC’s temperature. To ensure your system doesn’t overheat, monitor your CPU and GPU temperatures separately.
Use BIOS/UEFI to Control CPU Fan Speed
Restart your PC, and during startup, press the ‘Delete’ and ‘F12’ keys together to enter the BIOS settings. OR Navigate to: Settings > Update & Security > Recovery > Advanced Startup > Restart Now > Troubleshoot > Advanced options > UEFI Firmware settings > Click Restart.
In the BIOS settings, locate “Fan Control Settings.”
Go to “Monitor” > “Status” > “Fan speed control.”
Look for RPM settings and select the CPU fan to increase or decrease its speed using RPM as a unit.
Save these changes and exit the BIOS settings.
Troubleshooting CPU Fan Errors
If you encounter a CPU Fan error during startup, it’s likely a hardware issue, and the fan sensor may not be functioning correctly. In such cases, replacing the fan is a recommended solution. It’s important to note that a CPU fan running at full speed doesn’t necessarily indicate overheating; it could be due to a sensor malfunction.
Final Thoughts
Taking control of your fan speed on Windows 10 can enhance your system’s performance, energy efficiency, and reduce noise levels. However, it comes with risks, so proceed with caution. If your PC or laptop overheats, it could lead to irreversible hardware damage. Always monitor your system’s temperature to strike the right balance between keeping it cool and preventing potential harm.
We hope this guide has helped you understand how to control fan speed on Windows 10 effectively. Feel free to share your experiences or ask any questions in the comments below. Your feedback is valuable to us in ensuring your system runs optimally.
In the realm of Windows 10 or Windows 11, the administrator password holds the key to unlocking a realm of possibilities, allowing users to access elevated privileges and take full control of their systems. One of the most potent tools at your disposal for revealing this coveted password is the Command Prompt. In this comprehensive…
If you’re a Chrome user and have encountered the frustrating Chrome-error://chromewebdata/ error while visiting certain URLs, don’t worry – you’re not alone. This error can manifest for various reasons, including corrupted cache data, outdated browser versions, problematic extensions, or corrupted browser settings. Additionally, you might see the error message NET::ERR_CERT_COMMON_NAME_INVALID displayed. Fortunately, you’ve arrived at…
If you’re a Windows user, you might have encountered the perplexing “0x80070002” error at some point. This error code can emerge in various scenarios, from Windows updates to file operations, leaving you scratching your head. But worry not! In this comprehensive guide, we’re not just going to help you fix this error, but we’ll also…
If you’re an avid gamer or enthusiastic software user, you’ve probably encountered the infamous “0xc00007b/0xc000007b” error on your Windows system. This vexing error often rears its head when you excitedly launch a game or a software application, only to be met with disappointment. But fret not! In this comprehensive guide, we’re not just going to…
In the realm of Path of Exile trading, time is of the essence. Every second counts when securing the items you need. This guide will delve into the realm of Awakened PoE Trade keyboard shortcuts, revealing how they can revolutionize your trading approach. Benefits of Using Keyboard Shortcuts in Awakened PoE Trade: Efficiency is…
If you get Windows blue screen you already know what Physical Memory Dump is. This error witch appears only on windows OS often shows some real trouble you have with your device. This physical memory dump error can show either there is some corrupted files in software or there is some trouble /incompatible with your…
Is there an Adobe GC Invoker Utility running at startup in the task manager? Do you understand what on earth it does on Windows 10, 7, 8? More often than not, many other Adobe procedures will run at startup also, such as Adobe Creative Cloud, Adobe Updater Startup Utility, and AdobeGCClient.exe. Yes, this report will…
The * wildcard is known as the containing wildcard since it selects elements containing the set value. With the ^ wildcard, you get to select elements whose attribute value starts with the set value. The $ wildcard lets you select elements whose attribute values end with the specified value. What is the use of *…
Using SQL statements in Excel enables you to connect to an external data source, parse field or table contents and import data – all without having to input the data manually. Once you import external data with SQL statements, you can then sort it, analyze it or perform any calculations that you might need. Why…
This means that the maximum number of clients that may be connected to the server has been reached. Either the client will have to wait for another client to log off, or the administrator will have to increase the maximum number of connections allowed. How do I fix too many connections error? The MySQL “Too…